Wednesday, October 18, 2017

Child's Precious Memory Books


Our kids' childhood memories remain in our hearts forever! Yes, the best time of our life as  parents is the time that our kids were young and we we're taking care of them full time! When they were so dependent on us for everything and can't stay away from us, even when it annoys us , because there's no "me" time!  So precious are those memories , that we want to preserve it for forever!
           But they are not kids forever, and time fly away too fast. We get caught up in the everyday stress  of this life that sometimes we don't realize  that they are grown  and are  trying to live independently  from us....
          I wanted to keep all my kids memories in my heart, but better , if I can keep a physical record of the things that reminds me of their childhood. Sometimes moms are caught between throwing away all the papers that our kids brought from school or have doodled on ( as when they first start to write letters), but time will come that those papers will become very precious part of their lives if we have  kept and compiled it. I used to think that I don't have the money and the time to print and organize all their pictures and artworks. But with a little effort, I was able to set aside the excuse of being "busy" , and did it! You can also do it, all you need is time, effort and a little bit of money. It doesn't have to be expensive. Here's how I did it....

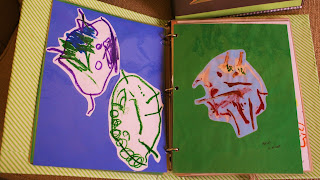
        Does your kids love to draw? Almost all kids love to draw when they're young! Don't waste those artworks, turn it into their memory books!
This is laminated using a 12x12 in
laminating sheets and  pad paper

laminating machine does not have to be too expensive. check the ratings.


        You may laminate them ( you will need a laminating machine and laminating sheets). Amazon has a cheap but really good one, I got mine for $20, and I buy the laminating sheets in packs of 100's.
On this , I lightly glued his drawings in a 12x12 cardstock paper, and laminated it. I punch holes and used a chain like the one used to make necklace ( available in Joann's or Michael's in the jewelry section).

My son loved to draw map of places he knew... our house, community
malls and market place. I really thought he would be a civil engineer!

Get a binder at it's cheapest price of the season, just like Target have their binders 70-90% off about a month  ago ( September), and Office Max, Office Depot will soon have it's  school supplies clearance, usually around November to December. I should know I only shop when its clearance! If you don't want to buy a new binder, you can use an old , used binder from previous school year and cover it with cardstock just like what I used here.

The flowers I used here are taken out from the stems,
if you buy flowers that are purposedly packed for
scrapbooking, it is more expensive . You can buy
$1 alphabet stamp pads from Walmart or Michael's.
Ariella loves to write stories since she was young.


Alia 's drawing has a uniquely sweet character to it!


Stock cards are usually on sale , $2 per pack of 50's from Joann's or Michael's.

I have five kids, and each one of them , I made their memory book , and will continue to make  one for the youngest one , she is turning 4 this November, and she will make more memories too. Each one of them too has a very unique imprint so it's so precious to keep these memories alive!
Adriel is the athletic one!

Tuesday, October 3, 2017

My incidental ladder design

      I have to admit, I am a big fan of Pinterest, anything artsy, I will read. Not a single day would pass that I won't click and open Pinterest, and  on the other hand, my husband hates Pinterest ( not because of anything else, but because every time I see something that I like, I ask him to do the hard part)!  Because of Pinterest, he had to learn to make stuffs... because of Pinterest , he had to buy electric cutter, tools, etc...But also because of Pinterest, we are able to have the furniture and decor that I would otherwise  afford only through 24-36 months no interest  financing, isn't that practical?
       It's so funny that my husband used to not even know how to use a hammer or a electic saw,  thanks to You Tube, my husband is now a handy man! I have to admit, some of the diy projects looks easy but in reality, it might require some learned skills. His only trade off, I can convince him to do stuffs ,  if I let him buy the tools and gadgets that he wants, fair deal? I guess so, since these tools are for life time, and I can continuously ask him to make projects for me!
       So to make the long story short, I found some pins of old ladders being used  to decorate different rooms, so I ask my husband to make me one, (of course, diy farm house design). My purpose was to  send it to my daughter's college dorm to be used for hanging towels and blankets, turned out there's not enough space in her room--- so this is what I did with it.....


 This picture shows  the diy wreath I made from my $4 grab bag flowers
from Michael's, a $3 lantern from Big lots ( end of summer clearance), and my very own Pace salsa
diy vase. The dining table was updated by re-staining.
      Materials Used for the ladder: 
          1 in by 2 in x 8 ft furring strip board ( 97 cents from Home depot)
          screws   and  a drill)
          miter saw ( to cut the lumber)
          sand paper ( if you have a  sander)
          espresso wood stain 
          latex paint 

                      This ladder is 6 ft long, 2 feet wide. To create a vintage look, I stained the ladder with the espresso stain. Let it dry for about a day.  Cover with paint ( I'm not very particular with the kind of paint, some people prefers chalk paint , but on this project I only used my oops paint from Home depot) . Sand  it very lightly,  paying particular  attention to the corners until the stain shows up. And oh-laaa - laa, it's done, ready for decoration! It is really easy, and cheap... try looking around stores, this ladder might very well cost   around  forty  ( if it's on clearance )  to seventy dollars!


Sunday, October 1, 2017

Art of Upcycling Glass Jars

One of the easiest thing that  I love to do is the art of upcycling glass jars--- why spend dollar or two when you can easily have them free after  preparing a simple  pasta alfredo dinner---uhhmmm, kids love this simple recipe that my husband uses  (maybe on my next post, will include this simple pasta alfredo recipe)--- after which you can upcycle the glass jars! Yes, I'm all about saving the environment by upcycling, and also saving some money along the way.


Steps: 
1.Wash and remove the jar label by soaking in soapy water for couple of hours. Rinse and air dry after.


2. Paint using acrylic paint or latex interior paint ( I love to buy the "oops paint" from Home Depot-- if you get a chance, check out their  clearance section and look for reduced color sample)


3. Once the paint dry, apply Mod Podge and let it dry. You are now ready to decorate!


I originally painted the one on the left with purple
latex paint, then after it dried up, I put a thin layer
of yellow acrylic paint, topped with mod podge
 for  gloss and protection . It turned  out    really
 good!
**Don't  forget  to  use  store  coupons  when buying
materials (I use 60% off  coupons from Joann's to buy 
Mod Podge) .  Every end of each  seasons ,  Michael's 
has  a  $2  grab  bag ,  some  locations  this  end   of
 summer 2017 had a $4 grab box / bag full of
flowers, ribbons and arts stuffs.

                                      Save your Starbucks coffee bottles to make neat
                                              art brushes and pen holders!
                              

I got this wood basket from Target $3 deal and I
asked my husband to separate it into two, to make
two wood baskets.
                               

My husband made me this cool wooden box
and it turned out perfect for my upcycled jars!
                   
the wood box was creatively made
by my dear husband!


Are you tired of your old glass vases? You can paint with an acrylic , chalk, or latex paint, cover if with Mod Podge once the paint dries up, and  give your vase a second chance!

A Starbucks bottle -turned vase!


This is also a second chance vase! 


My husband loves Pace salsa, and every time it's empty, I hate to throw it away... It looks cute just by tying a twine around it. It makes a perfect center piece for small dining table!


        Practical solution for storage and
        decoration too , for the restroom!


Isn't this georgeous and practical gift ideas, and
really isn't hard to do! 

pretty girls bows

                                  my passion to create cute little  things for cute little girls!                 ...